- 1. 需求
- 2. 获取openwrt镜像
- 3. 转换openwrt镜像
- 4. 创建虚拟机
- 5. 配置网络服务
- 6. 配置临时代理(可选)
- 7. 安装一些可能会用到的工具(可选)
- 8. 扩容和配置/overlay
- 9. 安装sing-box
- 10. 配置sing-box
- 11. 配置防火墙
- 12. 配置UI
1. 需求
- x86-64平台
- openwrt虚拟机作为旁路由实现翻墙
- 提供http、socks5混合代理服务
- openwrt可在线升级且不丢失配置
2. 获取openwrt镜像
在openwrt官方网站下载镜像,URL类似:
https://downloads.openwrt.org/releases/25.12.2/targets/x86/64/
在镜像文件列表中可以看到多种镜像类型,因为我需要实现在线更新不丢配置,所以选择generic-squashfs-combined-efi.img.gz。镜像关键词的含义如下表。
| 维度 | 关键词 | 说明 | 适用场景建议 |
| 文件系统 | ext4 | 全盘可写。没有只读分区,像普通 Linux 一样直接操作硬盘。 | Home Lab 首选。方便扩容硬盘空间,适合安装大量插件。 |
| squashfs | 只读+可写层。核心系统只读,修改内容存放在 overlay 分区。 | 生产环境/新手首选。支持“恢复出厂设置”,配置搞炸了能一键还原。 | |
| targz | 压缩归档包。不是磁盘镜像,而是文件集合。 | 专门用于 LXC 容器、Docker 镜像制作或手动部署。 | |
| 引导方式 | combined-efi | UEFI 引导。采用 GPT 分区表,包含专门的 EFI 分区。 | 现代设备首选。适配 Hyper-V 第二代虚拟机(Gen2)或近 10 年的 PC。 |
| combined | Legacy BIOS 引导。采用传统的 MBR 分区表。 | 适配老旧电脑、或 Hyper-V 第一代虚拟机(Gen1)。 | |
| 内容组成 | combined | 完整镜像。包含引导程序 (GRUB)、内核 (Kernel) 和系统 (Rootfs)。 | 全新安装首选。直接写盘或给虚拟机挂载磁盘就选这个。 |
| rootfs | 纯系统文件。不含引导逻辑和 Linux 内核。 | 仅用于在已有环境下进行 系统升级 (Sysupgrade)。 | |
| kernel | 纯内核。只有 Linux 内核文件。 | 极少数场景,如通过 PXE 网络引导启动。 |
3. 转换openwrt镜像
因为是在虚拟机中使用,需要将下载的img文件转换为虚拟机软件支持的虚拟机磁盘文件。在Windows中可以在wsl中安装qemu-utils工具。
转换为VMware格式(.vmdk)
qemu-img convert -f raw -O vmdk generic-ext4-combined-efi.img openwrt.vmdk
转换为Hyper-V格式(.vhdx)
qemu-img convert -f raw -O vhdx -o subformat=dynamic generic-ext4-combined-efi.img openwrt.vhdx
转换为PVE格式(.qcow2)
qemu-img convert -f raw -O qcow2 generic-ext4-combined-efi.img openwrt.qcow2
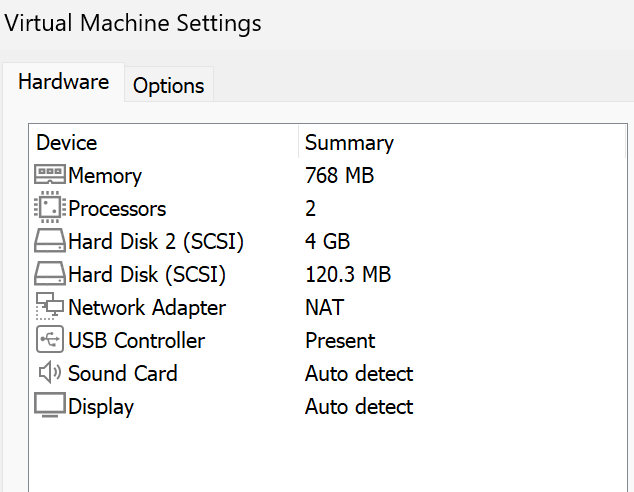
4. 创建虚拟机
我使用的是双层文件结构,比较方便的做法就是创建一个挂载两个磁盘文件的虚拟机,硬盘A使用转换后的openwrt镜像,硬盘B用作可写层/overlay,后文将这两个硬盘称之为“系统盘”和“overlay盘”。这里以hyper-v为例。记得虚拟机要关闭安全启动,因为openwrt虽然支持efi,但是还没有支持安全启动。

5. 配置网络服务
编辑/etc/config/network文件来配置网络地址,实际只修改lan接口部分的IP地址、子网掩码、网关。配置好后如下:
config interface 'loopback'
        option device 'lo'
        option proto 'static'
        list ipaddr '127.0.0.1/8'

config globals 'globals'
        option dhcp_default_duid '0004e8a912ffb3d34ceda342bcacadd6fec4'
        option ula_prefix 'fd02:6f6c:17ba::/48'
        option packet_steering '1'

config device
        option name 'br-lan'
        option type 'bridge'
        list ports 'eth0'

config interface 'lan'
        option device 'br-lan'
        option proto 'static'
        option ipaddr '192.168.1.66'
        option netmask '255.255.255.0'
        option gateway '192.168.1.1'
        list dns '192.168.1.2'
        list dns '8.8.8.8'
        option multipath 'off'

config device
        option name 'eth0'
        option ipv6 '0'
6. 配置临时代理(可选)
openwrt目前没有被墙,不过如果觉得觉得慢,仍然可以先临时配置一个代理服务器(重启后失效),这会使后面的apk update等操作更快速。
export http_proxy="http://192.168.1.55:2080"
export https_proxy="http://192.168.1.55:2080"
7. 安装一些可能会用到的工具(可选)
如果访问openwrt比较快,可以一次性把以后安装和调试可能会用到的工具全部安装。
apk update

# 安装核心工具、完整版网络调试工具及文件传输增强
apk add tcpdump curl vim-full nano \
        openssh-sftp-server bash \
        bind-dig mtr iperf3 \
        htop lsblk fdisk e2fsprogs \
        pciutils diffutils socat \
        wget-ssl ca-bundle \
        ncat parted block-mount
8. 扩容和配置/overlay
8.1 安装必要工具
apk update
apk add fdisk e2fsprogs parted block-mount
8.2 修复镜像转换时产生的小问题
使用fdisk -l时可以看到这样的错误提示:
GPT PMBR size mismatch (246304 != 246334) will be corrected by write.
The backup GPT table is not on the end of the device.
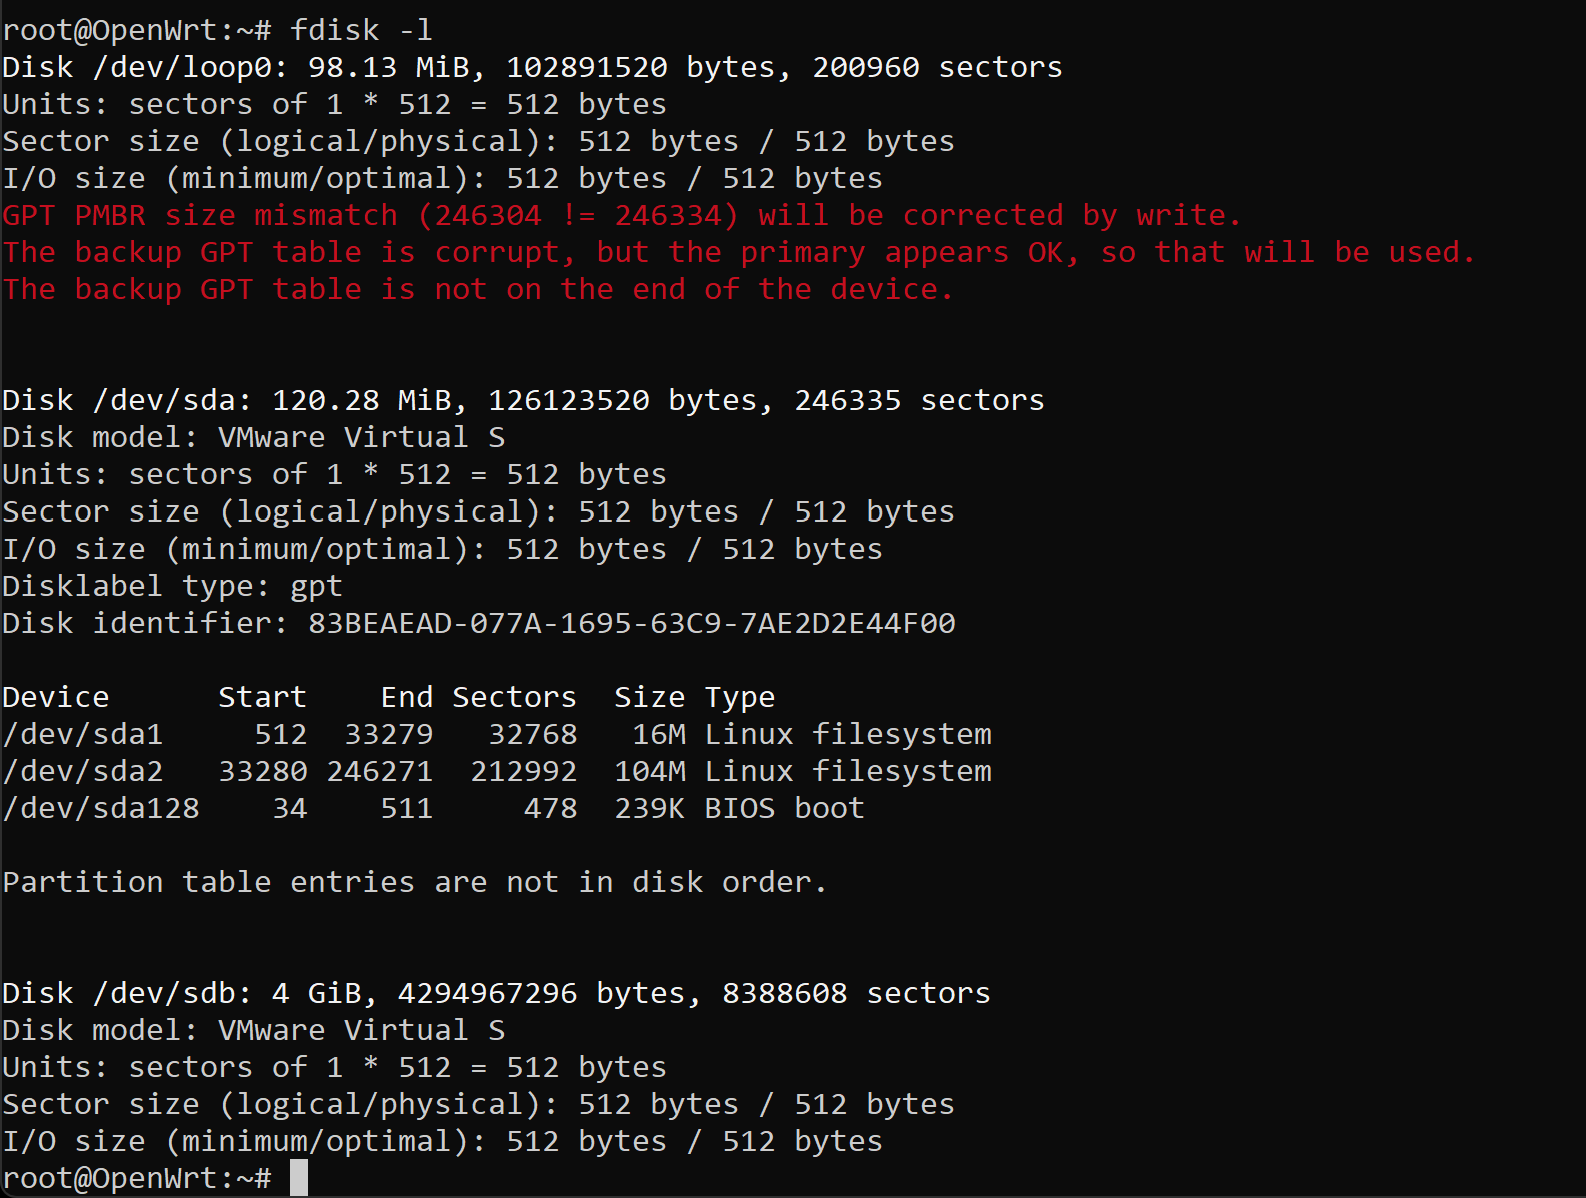
此现象源于 OpenWrt 磁盘镜像的逻辑边界与物理介质的实际容量不匹配。GPT 分区表规范要求在磁盘的首尾两端各存储一份分区信息,由于原始镜像预设的终止刻度远小于虚拟硬盘的物理空间,导致备份分区表未能定位在介质末端。简而言之,由于磁盘扩容后分区表的冗余校验机制失效,系统检测到逻辑定义的结束位置与硬件报告的实际物理结尾存在偏差。
parted -l
根据提示键入fix进行修复。
8.3 格式化overlay盘
# 创建 GPT 分区表并分出一个占满全盘的分区
parted /dev/sdb --script mklabel gpt mkpart primary ext4 0% 100%

# 格式化
mkfs.ext4 /dev/sdb1
8.4 获取overlay盘分区UUID
# 使用 block info 命令获取
block info | grep /dev/sdb1
8.5 配置自动挂载
block detect > /etc/config/fstab
然后使用 vim /etc/config/fstab 修改生成的配置,找到对应 /dev/sdb1 的那一块:
config 'mount'
        option  target  '/overlay'        # 关键:改为 /overlay
        option  uuid    '你的-UUID-字符串'  # 这里填入刚才记录的 UUID
        option  fstype  'ext4'
        option  options 'rw,noatime'
        option  enabled '1'               # 关键:改为 1
8.6 同步现有数据(关键,不做会丢失配置)
# 创建临时挂载点
mkdir -p /tmp/new_overlay
mount /dev/sdb1 /tmp/new_overlay

# 将当前的 overlay 目录内容同步到新磁盘
# 注意:使用 -a 保持权限一致
cp -a /overlay/. /tmp/new_overlay/

# 卸载临时挂载
umount /tmp/new_overlay
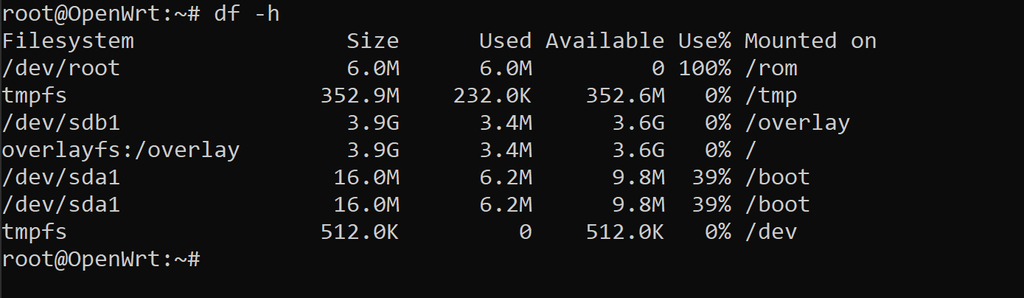
8.7 使配置生效并查看效果
#重启使配置生效
reboot
#查看效果
df -h
9. 安装sing-box
首先来看一下chatGPT的推荐目录结构,这里就按照这个目录结构安装。
/etc/sing-box/        ← 配置文件(默认)
/usr/bin/sing-box     ← 程序本体(默认)
/usr/share/sing-box   ←(只读资源,尽量别写)(这是默认的工作目录,不知道为什么只读特性体现在何处)

/var/lib/sing-box/    ← cache.db(推荐)
/www/sing-box-ui/     ← UI 静态资源(推荐)
有两种安装sing-box的路径。
| 安装路径 | 优势 | 劣势 |
|---|---|---|
| 软件源在线安装 | 配置方便 | 安装时可能需要翻墙,安装的sing-box版本可能较旧 |
| 二进制包手动部署 | sing-box版本选择灵活 | 配置相对麻烦 |
注意:sing-box不同版本配置文件可能差异非常大,1.12.x版本的配置文件给1.13.x的sing-box使用会提示很多错误且sing-box无法正常工作。
9.1 软件源在线安装
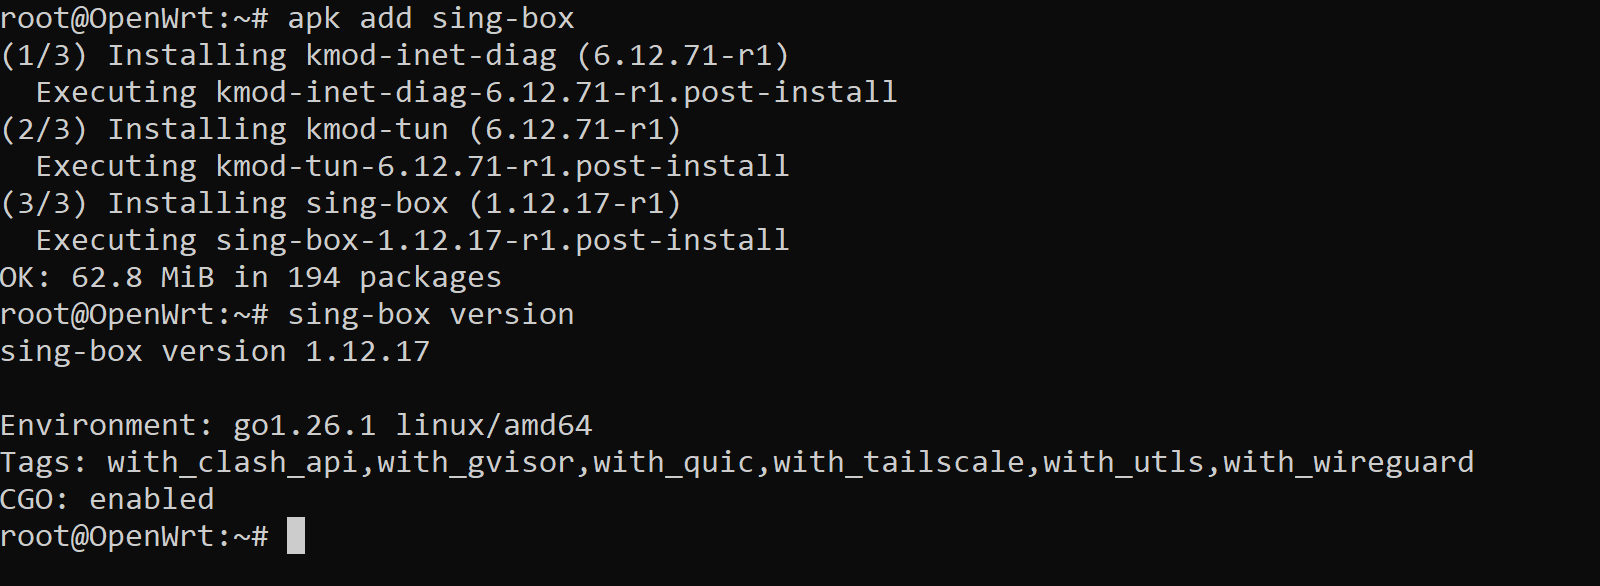
apk update
apk add sing-box
sing-box version
9.2 二进制包手动部署
9.2.1 下载并部署可执行程序及配置文件(目录)
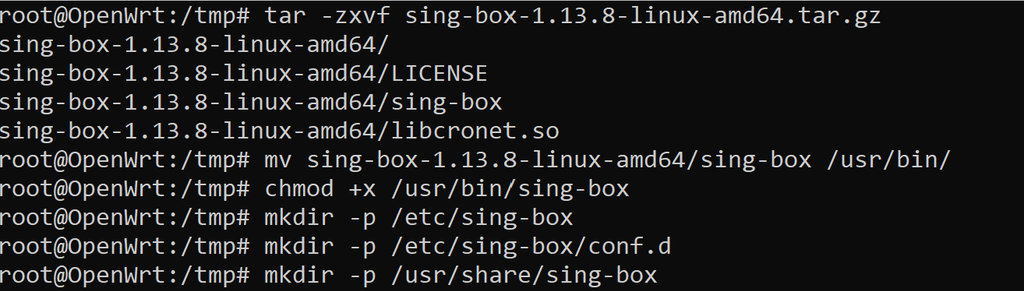
到官网https://github.com/SagerNet/sing-box下载二进制包然后传输到openwrt上,文件名类似sing-box-1.13.8-linux-amd64.tar.gz。也可以复制二进制包的url然后在openwrt命令行中下载。sing-box还提供专用于openwrt的apk包,但是不建议使用这种包,apk包会严格校验openwrt版本,实际场景经常因此安装失败。
root@OpenWrt:~# cd /tmp
root@OpenWrt:/tmp# tar -zxvf sing-box-1.13.8-linux-amd64.tar.gz
sing-box-1.13.8-linux-amd64/
sing-box-1.13.8-linux-amd64/LICENSE
sing-box-1.13.8-linux-amd64/sing-box
sing-box-1.13.8-linux-amd64/libcronet.so
root@OpenWrt:/tmp# mv sing-box-1.13.8-linux-amd64/sing-box /usr/bin/
root@OpenWrt:/tmp# chmod +x /usr/bin/sing-box
#创建配置目录
root@OpenWrt:/tmp# mkdir -p /etc/sing-box/conf.d
#创建工作目录
root@OpenWrt:/tmp# mkdir -p /usr/share/sing-box
9.2.2 创建服务
nano /etc/init.d/sing-box
将默认配置写入该文件中。
#!/bin/sh /etc/rc.common

USE_PROCD=1
START=99

script=$(readlink "$initscript")
NAME="$(basename ${script:-$initscript})"
PROG="/usr/bin/sing-box"

start_service() {
        config_load "$NAME"

        local enabled user group conffile workdir ifaces
        config_get_bool enabled "main" "enabled" "0"
        [ "$enabled" -eq "1" ] || return 0

        config_get user "main" "user" "root"
        config_get conffile "main" "conffile"
        config_get ifaces "main" "ifaces"
        config_get workdir "main" "workdir" "/usr/share/sing-box"

        mkdir -p "$workdir"
        local group="$(id -ng $user)"
        chown $user:$group "$workdir"

        procd_open_instance "$NAME.main"
        procd_set_param command "$PROG" run -c "$conffile" -D "$workdir"

        # Use root user if you want to use the TUN mode.
        procd_set_param user "$user"
        procd_set_param file "$conffile"
        [ -z "$ifaces" ] || procd_set_param netdev $ifaces
        procd_set_param stdout 1
        procd_set_param stderr 1
        procd_set_param respawn

        procd_close_instance
}

service_triggers() {
        local ifaces
        config_load "$NAME"
        config_get ifaces "main" "ifaces"
        procd_open_trigger
        for iface in $ifaces; do
                procd_add_interface_trigger "interface.*.up" $iface /etc/init.d/$NAME restart
        done
        procd_close_trigger
        procd_add_reload_trigger "$NAME"
}
10. 配置sing-box
sing-box支持配置文件和配置目录两种方式。默认使用单一配置文件,如果配置内容较多,该文件会很长,修改和审计起来很麻烦。所以这里使用配置目录方式,我们可以按照配置文件的类别创建多个配置文件,将这些配置文件存放于一个专用目录中,而后将这个目录指定为sing-box的配置目录即可。
10.1 创建配置目录
mkdir -p /etc/sing-box/conf.d
10.2 修改服务配置
nano /etc/init.d/sing-box
-c(小写)是指定配置文件,-C(大写)是指定配置目录。
将原配置文件中的
procd_set_param command "$PROG" run -c "$conffile" -D "$workdir"
改为
procd_set_param command "$PROG" run -C '/etc/sing-box/conf.d/' -D "$workdir" #注意这里将默认的-c(小写)改为-C(大写)
11. 配置防火墙
信任tun虚拟网卡(假设网卡名是singtun0),不然无法使用。
# 把 singtun0 塞进 lan 这个信任区
# 这样防火墙就会像对待自己的 lan 接口一样对待 singtun0
uci add_list firewall.@zone[0].device='singtun0'
uci commit firewall
/etc/init.d/firewall restart
12. 配置UI
共两步,放置ui文件和添加配置项。
12.1 放置ui文件
创建两个目录。
用于存放缓存文件
mkdir -p /www/sing-box-ui
用于存放web ui文件
mkdir -p /var/lib/sing-box/
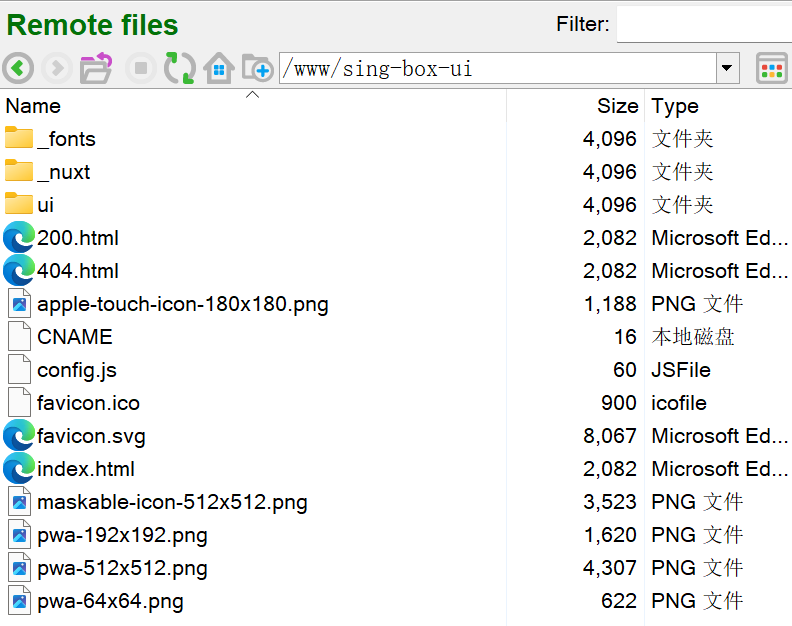
将下载到的metacubexd包,解压到工作目录的ui目录,默认是/www/sing-box-ui。
12.2 添加配置项
{
  "experimental": {
    "cache_file": {
      "enabled": true,
      "path": "/var/lib/sing-box/cache.db",
      "store_fakeip": true,
      "store_rdrc": true
    },
    "clash_api": {
      "external_controller": "0.0.0.0:9090",
      "external_ui": "/www/sing-box-ui",
      "secret": "password",
      "default_mode": "rule",
      "access_control_allow_origin": ["*"],
      "access_control_allow_private_network": true,
    }
  }
}
发表回复